You will recognize Judith's sketch from Rockin' and Rollin' prints and remember that I mentioned her method for working on a sketch after the sketchout. There are a number of ways to do this and I'm going to talk about a couple here with help from Richard Scruggs and from Judith.
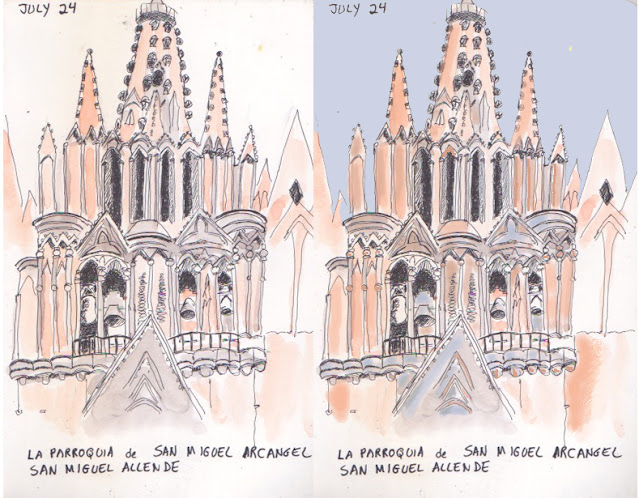
So is this "allowed"? Oh, yes. As long as the sketch was done ON LOCATION and from life, you are certainly allowed to clean up, amend, correct or enhance your work. I frequently look at my watercolors after the fact and boost anemic color. We all know that watercolors tend to dry lighter. So this is most certainly a way to improve a sketch. Here is an example from my work several years ago. 
A sketch done on a trip to San Miguel several summers ago
I thought the color looked a bit anemic although I liked the sketch. I don't own a lot of fancy software, but a little playing in PhotoshopLE helped. The sky, although clearly added digitally, makes the building "pop".
Richard travels a lot. And of course you can't hold up the whole tour or your very patient spouse while you sketch. So Richard often draws in place, takes pictures and completes the sketch in the hotel room or at home.
 |
| Richard Scruggs- Avignon |
I did the painting back on the river cruise boat. You will see some ink additions. For example, I added a couple of people to the scene (based on pictures I took). I also added lines in the foreground to add texture to the ground and draw the eye in.
A piece of advice if people want to adopt this approach when traveling…take a couple of good pictures. They really help me define where the shadows go and how strong they should be. Of course, they help with color as well.
I really believe adopting that attitude that it is OK to finish it later has freed me up. It allows me to do many more sketches than I would otherwise. I know, if I didn’t do this, I’d choose spending time with my travel companions instead. "
 |
| The Pier |
If you look close, you will see that I strengthened some ink lines, added a few lines indicating shadows (left side of the sidewalk and on the walkway up to the building), and better defined the crevices between the rocks. I also added some of the pilings in the background under the pilings."

The Stonehenge relica in Odessa
About this drawing, Richard says, "This is one I did on a hot west Texas day where there was just no shade. It is the Stonehenge replica in Odessa, TX.
I did the pencil and ink work on site then retreated to my daughter’s back porch to paint it. I did not make many additions or changes to the ink work between the drawing and painting stage."
But I would add to Richard's comments. By zooming in on the stones themselves, stretching them across the page and painting a lighter, partial sky behind the stones, he changes the whole mood and emphasizes those monumental stones.
 |
| Bridal Veil Falls |
Here are Richard's notes: "Here is an example of one I touched up back at the lodge. There is not a lot of difference but, if you look closely, you’ll see that the colors are strengthened on some places, particularly the vegetation to left of the upper half of the falls. Also, in several spots along the left side of the water, I added white dots with a pen to show water splashing."
 |
| The Elissa |
Richard comments, "Judy and I sketched together on this day.
Even though I had the time and shade, I opted to focus on the ink drawing on site and painted it later. The main difference in the ink lines between the initial drawing and the final is that I added a few people and strengthened a few lines. I also darkened the area under the pier.
Darkening an area is one of the things I do most often when I touch up later. Deeping the shadows or a doorway or an area under the pier makes the rest stand out more and adds depth to the scene. Another thing I do when I touch up is find missing ink lines or strengthen certain lines. Particularly on a building, strengthening a line can make a corner or architectural detail stand out a little more.
Sometimes I add a few extra shadows, say under a window ledge to better tell the story. A detail like that is something I might easily miss when I’m working outside and little hurried to get to the next event or catch up with the people I know that are waiting on me. “
So it doesn't take computer software or a tablet to improve a sketch. All of Richard's work was done with just his art materials.
Judith takes us through an entire process on ONE sketch that she made in a cafe in Italy. Here she was thinking about contrast, balance and composition.
"As a graphic designer, I often edit my sketchbook drawings for use in print, for client projects and my own postcards, calendars, and business cards. Part of this process is analog and part digital. I’ve been a graphic designer for many years and have both a desktop scanner and Photoshop software for this process, as well as lots of experience using both. An iPad with Procreate software and Apple pencil also works for this process."
Judith says, "Step 1:the sketch - done on location and rarely takes more than an hour. The example here probably took 30 minutes. Drawn in pencil with watercolor on top. If I’m lucky, I remember to take a photo on location which helps if I don’t complete the sketch on-location."
Remember, Judith is often traveling with her husband, Dave, or a companion. Time is precious.
"Step 2: Re-visit my sketchbook page. I see there is very little contrast which makes the image hard to “read”.
Step 2.2: scan before making changes, I might like the “before” version better.
Step 3: Add another layer of watercolor in some areas to increase saturation. I frequently use colored pencil here as well.
Step 4: Build up the darks in the shadows to increase contrast and make foreground items pop forward."
These steps identify the focus of Judith's sketch. The people now stand out.
 |
| Deeper tones of saturated watercolor |
 |
| Retouching for stray marks |
"Step 6: High resolution scan at 350 ppi. (pixels per inch) This is for getting good quality prints. For images on screen only I use 150 ppi, for smaller file size.
Step 7: using Photoshop on my MacBook or Procreate on an iPad Pro with an Apple pencil. Clean up all the edges, get rid of smears and specs. Edit out the gutter (seam) down the center of the sketchbook spread. Add white “paper” around the outside of image. I don’t generally manage to keep my sketches away from the edge of the paper so adding more “breathing room” around the image helps center it on the page.
Step 8: Limited retouch any wayward lines. Just clean up a few but leaving the majority. I want to retain the immediacy shown in the sketchy line work."
The next step, for this sketch, was a major edit for composition. Imagine that if you are on a trip, you may want to keep a bit of a diary somewhere on the page. What Judith does next makes that possible.
 |
| The coffee cup moves to the right |
 |
| Before and after |
With this improved sketch, Judith can use it professionally, or offer prints for sale.
Not all of us may want to do this, but it is well worth taking a bit of time at home to strengthen a line, erase a stray mark, deepen the watercolor, add a little pencil shading, etc. And you will be amazed at how much happier you are looking back at your sketches.
I hope this bonus blog post has given you new things to think about to improve your sketching practice. Thanks to Judith and Richard for their help.


